Websocket介绍及使用

1. 前言

最近需要一种web服务端推送信息到客户端的技术,于是了解到websocket技术。经过几天的学习,对websocket技术有了一定的了解,遂整理了网上的资料写下了这篇博客,来加深自己的理解。

2. websocket简介

2.1 websocket出现背景

HTTP 协议从版本1.0发展到1.1,除了默认长连接之外就是缓存处理、带宽优化和安全性等方面的不痛不痒的改进。它一直保留着无状态、请求/响应模式,也就意味着服务器无法主动推送信息给客户端。

此处输入图片的描述
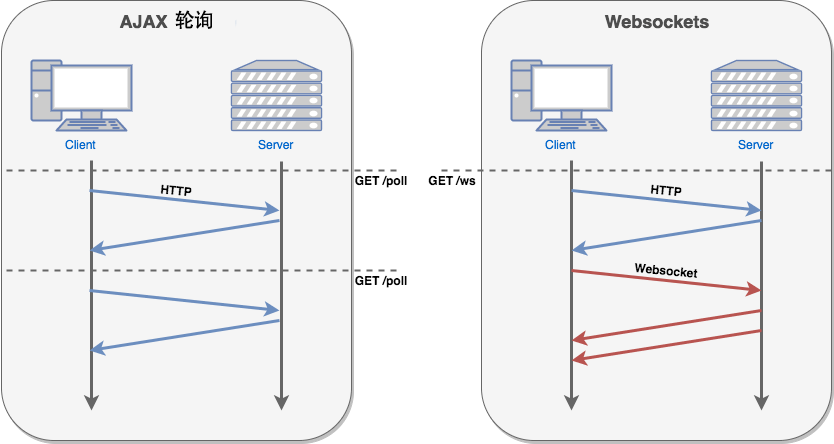
在WebSocket出现之前,很多网站为了实现实时推送技术,通常采用的方案是Ajax轮询(Polling)和Comet技术,Comet又可细分为两种实现方式,一种是长轮询机制,一种称为流技术,这两种方式实际上是对轮询技术的改进,这些方案带来很明显的缺点,需要由浏览器对服务器发出HTTP request,大量消耗服务器带宽和资源。面对这种状况,HTML5定义了WebSocket协议,能更好的节省服务器资源和带宽并实现真正意义上的实时推送。

2.2 websocket特点

WebSocket协议本质上是一个基于TCP的协议,它由通信协议和编程API组成,WebSocket能够在浏览器和服务器之间建立双向连接,以基于事件的方式,赋予浏览器实时通信能力。既然是双向通信,就意味着服务器端和客户端可以同时发送并响应请求,而不再像HTTP的请求和响应。

它与HTTP一样通过已建立的TCP连接来传输数据,但是它和HTTP最大不同是:

  • WebSocket是一种双向通信协议。在建立连接后,WebSocket服务器端和客户端都能主动向对方发送或接收数据,就像Socket一样;
  • WebSocket需要像TCP一样,先建立连接,连接成功后才能相互通信。
    此处输入图片的描述

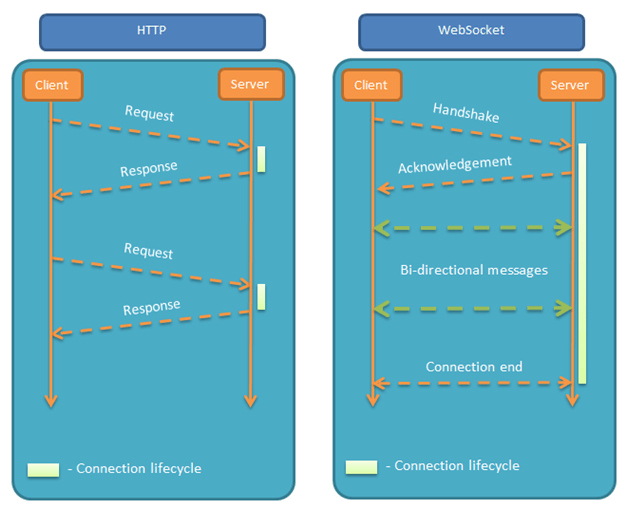
相比HTTP长连接,WebSocket有以下特点:

  • 是真正的全双工方式,建立连接后客户端与服务器端是完全平等的,可以互相主动请求。而HTTP长连接基于HTTP,是传统的客户端对服务器发起请求的模式。
  • HTTP长连接中,每次数据交换除了真正的数据部分外,服务器和客户端还要大量交换HTTP header,信息交换效率很低。Websocket协议通过第一个request建立了TCP连接之后,之后交换的数据都不需要发送 HTTP header就能交换数据,这显然和原有的HTTP协议有区别所以它需要对服务器和客户端都进行升级才能实现(主流浏览器都已支持HTML5)。此外还有multiplexing、不同的URL可以复用同一个WebSocket连接等功能。这些都是HTTP长连接不能做到的。

3. websocket整合SpringBoot的简单使用实例

3.1 服务端

WebSocketServer.java

@ServerEndpoint("/websocket/{sid}")
@Component
public class WebSocketServer {

private static Log log= LogFactory.get(WebSocketServer.class);
//静态变量,用来记录当前在线连接数。应该把它设计成线程安全的。
private static int onlineCount = 0;
//concurrent包的线程安全Set,用来存放每个客户端对应的MyWebSocket对象。
private static CopyOnWriteArraySet<WebSocketServer> webSocketSet = new CopyOnWriteArraySet<WebSocketServer>();

//与某个客户端的连接会话,需要通过它来给客户端发送数据
private Session session;

//接收sid
private String sid="";
/**
* 连接建立成功调用的方法*/
@OnOpen
public void onOpen(Session session,@PathParam("sid") String sid) {
this.session = session;
webSocketSet.add(this); //加入set中
addOnlineCount(); //在线数加1
log.info("有新窗口开始监听:"+sid+",当前在线人数为" + getOnlineCount());
this.sid=sid;
try {
sendMessage("连接成功");
} catch (IOException e) {
log.error("websocket IO异常");
}
}

/**
* 连接关闭调用的方法
*/
@OnClose
public void onClose() {
webSocketSet.remove(this); //从set中删除
subOnlineCount(); //在线数减1
log.info("有一连接关闭!当前在线人数为" + getOnlineCount());
}

/**
* 收到客户端消息后调用的方法
*
* @param message 客户端发送过来的消息*/
@OnMessage
public void onMessage(String message, Session session) {
log.info("收到来自窗口"+sid+"的信息:"+message);
//群发消息
for (WebSocketServer item : webSocketSet) {
try {
item.sendMessage(message);
} catch (IOException e) {
e.printStackTrace();
}
}
}

/**
*
* @param session
* @param error
*/
@OnError
public void onError(Session session, Throwable error) {
log.error("发生错误");
error.printStackTrace();
}
/**
* 实现服务器主动推送
*/
private void sendMessage(String message) throws IOException {
this.session.getBasicRemote().sendText(message);
}


/**
* 群发自定义消息
* */
public static void sendInfo(String message,@PathParam("sid") String sid) throws IOException {
log.info("推送消息到窗口"+sid+",推送内容:"+message);
for (WebSocketServer item : webSocketSet) {
try {
//这里可以设定只推送给这个sid的,为null则全部推送
if(sid.equals("undefined")) {
item.sendMessage(message);
}else if(item.sid.equals(sid)){
item.sendMessage(message);
}
} catch (IOException e) {
continue;
}
}
}

private static synchronized int getOnlineCount() {
return onlineCount;
}

private static synchronized void addOnlineCount() {
WebSocketServer.onlineCount++;
}

private static synchronized void subOnlineCount() {
WebSocketServer.onlineCount--;
}
}

WebSocketConfig.java

@Configuration
public class WebSocketConfig {
@Bean
public ServerEndpointExporter serverEndpointExporter(){
return new ServerEndpointExporter();
}
}

CheckCenterController.java

@RestController
@RequestMapping("/api")
public class CheckCenterController {

//推送数据接口
@ResponseBody
@RequestMapping("/socket/push/{cid}")
public String pushToWeb(@PathVariable String cid,String message) {
try {
WebSocketServer.sendInfo(message,cid);
} catch (IOException e) {
e.printStackTrace();
return cid+"#"+e.getMessage();
}
return cid;
}
}

3.2 客户端

为了方便运行,本客户端简单的使用了静态html来演示,其中用到了一点vue和element-ui知识。

<!DOCTYPE html>
<html>
<head>
<meta charset="UTF-8">
<link rel="stylesheet" href="https://unpkg.com/element-ui/lib/theme-chalk/index.css">
<script src="https://unpkg.com/vue/dist/vue.js"></script>
<script src="https://unpkg.com/element-ui/lib/index.js"></script>
<script src="https://unpkg.com/axios/dist/axios.min.js"></script>
</head>

<body>
<div id="app">
<el-row style="text-align:center;">
<el-input v-model="id" style="width: 200px;" placeholder="请填写注册id"></el-input>
<el-button type="primary" @click="getConnect">连接</el-button>
</el-row>
<el-row style="margin: 0 auto; margin-top: 30px;">
<el-col :span="8" :offset="8">
<el-card class="box-card" :body-style="{ padding: '30px' }">
<div slot="header" class="clearfix">
<span>发送消息</span>
</div>
<el-form ref="form" :model="form" label-width="80px">
<el-form-item label="接收方id">
<el-input v-model="form.id"></el-input>
</el-form-item>
<el-form-item label="消息内容">
<el-input v-model="form.message"></el-input>
</el-form-item>
<el-form-item>
<el-button type="primary" @click="sendMeaage">发送</el-button>
</el-form-item>
</el-form>
</el-card>
</el-col>
</el-row>


</div>
</body>

<script>
new Vue({
el: '#app',
data: function () {
return {
id: '',
visible: false,
form: {
id: undefined,
message: '',
},
}
},
methods: {
getConnect: function () {
var mynotify = this;
var socket;
if (typeof (WebSocket) == "undefined") {
console.log("您的浏览器不支持WebSocket");
} else {

console.log("您的浏览器支持WebSocket");
//实现化WebSocket对象,指定要连接的服务器地址与端口 建立连接
socket = new WebSocket("ws://localhost:8080/websocket/"+this.id);
// socket = new WebSocket("${basePath}websocket/${cid}".replace("http","ws"));
//打开事件
socket.onopen = function () {
console.log("Socket 已打开");
socket.send("这是来自客户端的消息" + location.href + new Date());
};
//获得消息事件
socket.onmessage = function (msg) {
console.log(msg.data);
mynotify.$notify({
title: '消息',
message: msg.data,
type: 'success'
});
//发现消息进入 开始处理前端触发逻辑
};
//关闭事件
socket.onclose = function () {
console.log("Socket已关闭");
};
//发生了错误事件
socket.onerror = function () {
alert("Socket发生了错误");
//此时可以尝试刷新页面
}
}
},

sendMeaage: function () {
axios.get('http://localhost:8080/api/socket/push/'+this.form.id+'?message='+this.form.message)
.then(function (response) {
console.log(response);
})
.catch(function (error) {
console.log(error);
});
},
},
})
</script>
</html>

4. 项目源码

最后附上项目源代码

-------------本文结束感谢您的阅读-------------